


 Troubleshooting due to third party interference
 BigBlueButton Videos
To help you get an overview of the many features, we have grouped the explanatory pages of this learning module and other information on this page into chapters. Clicking on a heading will take you to the desired chapter.
Preparing a session
Create a room
First navigate to the Webconf login page. Log in with your identifier, sXXXX or jXXXX (for students) or gXXXX (for staff), and select "Create a new room". Make the settings as desired and invite participants to your session using the permalink.
First navigate to the Webconf login page. Log in with your identifier, sXXXX or jXXXX (for students) or gXXXX (for staff), and select "Create a new room". Make the settings as desired and invite participants to your session using the permalink.
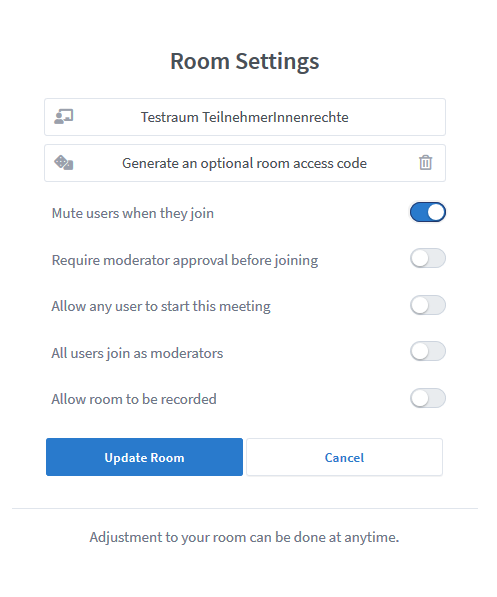
Room settings
Use room settings to keep track of large groups. For example, all new arrivals can be muted. This ensures that speakers are not disturbed by background noise from newcomers. Or use the 'Moderator approval before entering the room' feature if different people or groups need to take turns in the room.
Use room settings to keep track of large groups. For example, all new arrivals can be muted. This ensures that speakers are not disturbed by background noise from newcomers. Or use the 'Moderator approval before entering the room' feature if different people or groups need to take turns in the room.
Using the extra features with an account
Sign in to share rooms with others. This allows you to create permanent rooms for recurring groups that everyone can find.
Sign in to share rooms with others. This allows you to create permanent rooms for recurring groups that everyone can find.
Anlegen eines Raums am Beispiel der Philipps-Universität Marburg, bitte beachten Sie, dass Sie an der JLU den Benutzernamen in der Form sXXXX oder jXXXX (für Studierende) und gXXXX (für Mitarbeitende) angeben.
Settings in a session
Entering a room - the audio test
Before entering each room (including breakout rooms), you will be asked if you would like to participate with or without a microphone. This is the audio test. It is always advisable to participate with a microphone, as you can mute it. If the "Listen only" option is selected, it is possible to activate the microphone later by left-clicking on the "Stop audio" option and then left-clicking on the "Start audio" icon and selecting "With microphone" to rejoin the conference.
Before entering each room (including breakout rooms), you will be asked if you would like to participate with or without a microphone. This is the audio test. It is always advisable to participate with a microphone, as you can mute it. If the "Listen only" option is selected, it is possible to activate the microphone later by left-clicking on the "Stop audio" option and then left-clicking on the "Start audio" icon and selecting "With microphone" to rejoin the conference.
Turning the microphone on and off
Select the microphone icon to mute or speak. It is recommended that non-speaking participants turn off the microphone to avoid background noise. As the presenter, you can also mute other participants by clicking on their name and selecting the mute option.
Select the microphone icon to mute or speak. It is recommended that non-speaking participants turn off the microphone to avoid background noise. As the presenter, you can also mute other participants by clicking on their name and selecting the mute option.
Reducing the data transferred during a BigBlueButton Session
As a presenter, you can set up the entire BBB room to minimise data transfer. Consider these settings to allow people with poorer internet access to participate in BigBlueButton events and to reduce the load on the servers.
Specifically, this means avoiding webcam transmissions unless absolutely necessary. The same applies to screen sharing your desktop or individual windows.
To do this, click on Options in the top right-hand corner and then on Open Settings. Check the 'Save data volume' box and uncheck webcams and screen transfers.
Erklärvideo zu Datensparsamkeitseinstellungen in BigBlueButton
How to turn your webcam on and off
Select the camera icon to turn your webcam on or off. As a presenter, you can control camera sharing permissions for each participant individually.
Select the camera icon to turn your webcam on or off. As a presenter, you can control camera sharing permissions for each participant individually.
Roles in the meeting: presenter and host
As a presenter, you can upload a presentation, share an external video, or navigate through an existing presentation. As a presenter, you can also manage the rights of other participants and appoint additional presenters. Presenters can be recognised by the square shape of their name icon in the participants list. For presenters, this icon is supplemented by a small screen icon.
As a presenter, you can upload a presentation, share an external video, or navigate through an existing presentation. As a presenter, you can also manage the rights of other participants and appoint additional presenters. Presenters can be recognised by the square shape of their name icon in the participants list. For presenters, this icon is supplemented by a small screen icon.
Presentate and activate
Embed your own presentation or external video.
You don't have to share your screen to show interesting internet videos or your presentation. To do so, use the functions hidden behind the plus sign in the bottom left corner. This will ensure better quality.
You don't have to share your screen to show interesting internet videos or your presentation. To do so, use the functions hidden behind the plus sign in the bottom left corner. This will ensure better quality.
Hint:
If you save your presentation as a PDF before uploading it, you reduce the risk of being surprised by BBB's conversion.
If you want to use the collaborative whiteboard, it is recommended that you add a white slide to the presentation in an appropriate place.
Please note that there is no export feature for the annotated/edited presentation. Please take screenshots if necessary.
Web links will not be clickable in the uploaded presentation. If you need to do this, please use the shared notes.
Video zu Präsentationen in BigBlueButton
Video zur Einbindung externer Videos
Show your own screen (not for mobile devices).
You can use screen sharing to show all the applications on your device, so you can show how software works, use drawing software to explain relationships graphically, or show your presentation with animations.
You can use screen sharing to show all the applications on your device, so you can show how software works, use drawing software to explain relationships graphically, or show your presentation with animations.
Show of hands status
Participants can raise their hands during a webinar. To do this, use the status feature hidden behind the name icons. You can choose from a variety of mood emoticons and the hand as a signal.
Participants can raise their hands during a webinar. To do this, use the status feature hidden behind the name icons. You can choose from a variety of mood emoticons and the hand as a signal.
Written communication and documentation
In public chat you can share something with everyone or start a private chat by clicking on someone's name. Shared notes are great for logs or other forms of documentation. Clickable links can also be shared using either function.
In public chat you can share something with everyone or start a private chat by clicking on someone's name. Shared notes are great for logs or other forms of documentation. Clickable links can also be shared using either function.
Video zu Chat
Video zu geteilten Notizen
Shared whiteboard drawing
If you select another slide in the centre below the default slide, the presenter can share the whiteboard. To do this, click the whiteboard icon on the right side of the control bar.
If you select another slide in the centre below the default slide, the presenter can share the whiteboard. To do this, click the whiteboard icon on the right side of the control bar.
Hint: Advise group members to upload a presentation with white slides if you want these whiteboards to be available in breakout rooms.
Video zum Whiteboard in BigBlueButton
Using breakout rooms for group work
By clicking on the cog, you can create any number of breakout rooms and assign your group to these rooms either randomly or manually. A new room will open in a new tab for participants, or they can choose a room to join themselves. Remind your learning group that the new room will not automatically return to the original room and that they will need to switch tabs to do so. Feel free to be generous with the duration of rooms. Breakout rooms can be closed at any time by the facilitator.
By clicking on the cog, you can create any number of breakout rooms and assign your group to these rooms either randomly or manually. A new room will open in a new tab for participants, or they can choose a room to join themselves. Remind your learning group that the new room will not automatically return to the original room and that they will need to switch tabs to do so. Feel free to be generous with the duration of rooms. Breakout rooms can be closed at any time by the facilitator.
Activation through small polls
The Poll/Vote function is a small tool that allows you to include both pre-made and self-created polls in the conversation. Use it to involve learners in what is happening or to get feedback on learning progress or aspects of assessment.
The Poll/Vote function is a small tool that allows you to include both pre-made and self-created polls in the conversation. Use it to involve learners in what is happening or to get feedback on learning progress or aspects of assessment.
Using the Stud.IP Plug-In
Using the ILIAS plug-in
Using the BigBlueButton ILIAS plugin
ILIAS offers the possibility to create a BigBlueButton room using an ILIAS plugin. As this feature has only been available for a short time, courses created before the integration of BigBlueButton may experience some complications.
ILIAS offers the possibility to create a BigBlueButton room using an ILIAS plugin. As this feature has only been available for a short time, courses created before the integration of BigBlueButton may experience some complications.
Hint: The easiest way to recognise an ILIAS course that was created before the integration of the BigBlueButton plugin is that it does not offer the option to create a Big Blue Button room in ILIAS via the "Add new object" button.
Video zur Verwendung des BigBlueButton ILIAS Plug-Ins
Special features when using BigBlueButton's ILIAS plugin
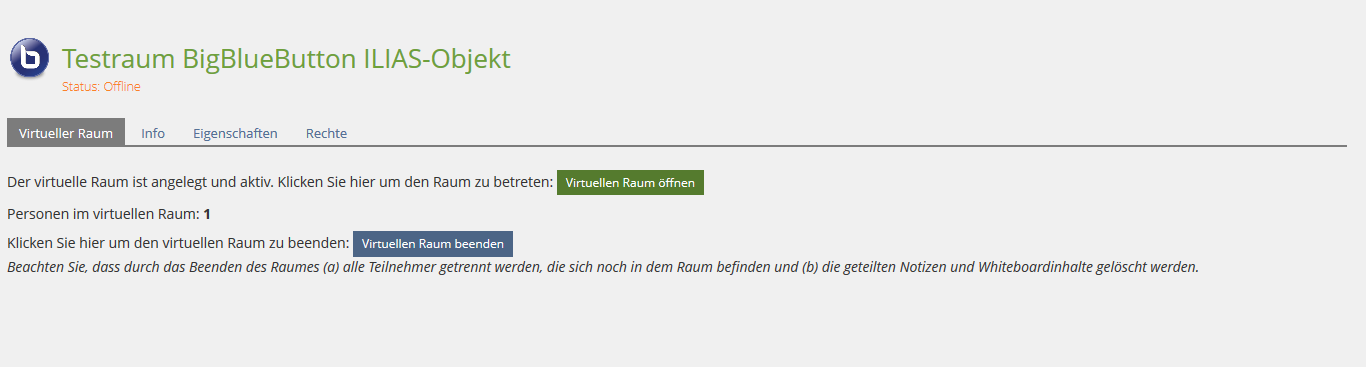
The rooms you have created in ILIAS using the BigBlueButton plugin can only be opened in ILIAS by course administrators. Course participants can only join a room after it has been opened by an administrator. So please open your rooms early enough to avoid confusion among participants.
Course administrators in ILIAS are automatically moderators in the BigBlueButton room. Course participants automatically join a BigBlueButton session via ILIAS.
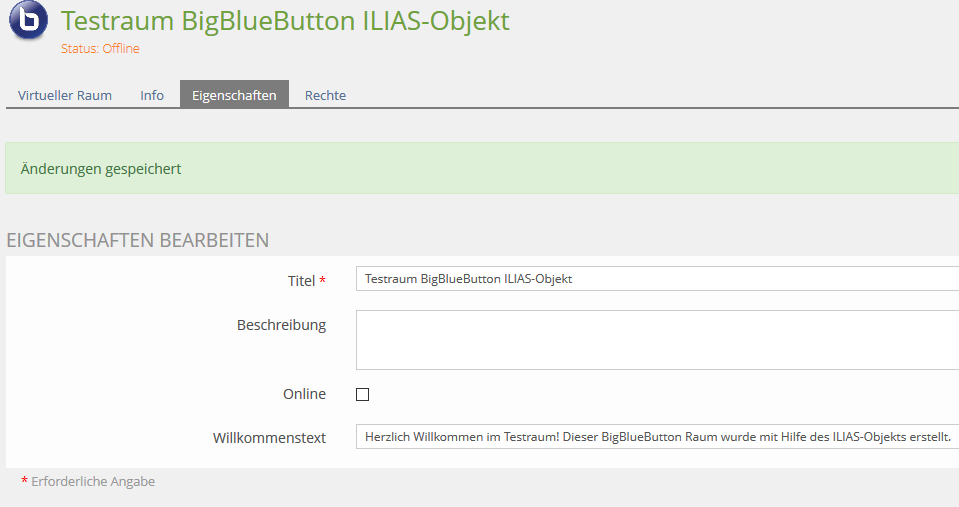
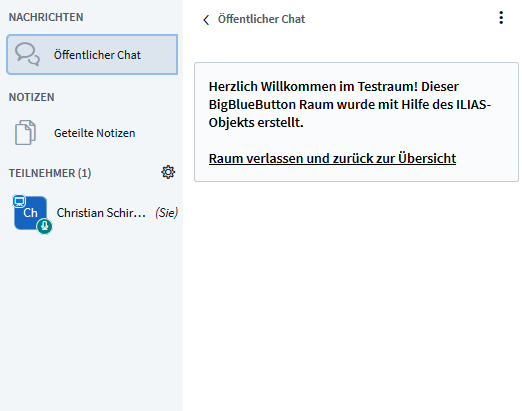
If a BigBlueButton room is created in ILIAS, an individual welcome text can be created for the room, which will appear above the public chat. Use the function "Welcome text" in the tab "ILIAS object properties".
Once a BigBlueButton room has been created in ILIAS, it can only be joined with a unique name. It is not possible to change the name used to join the room.
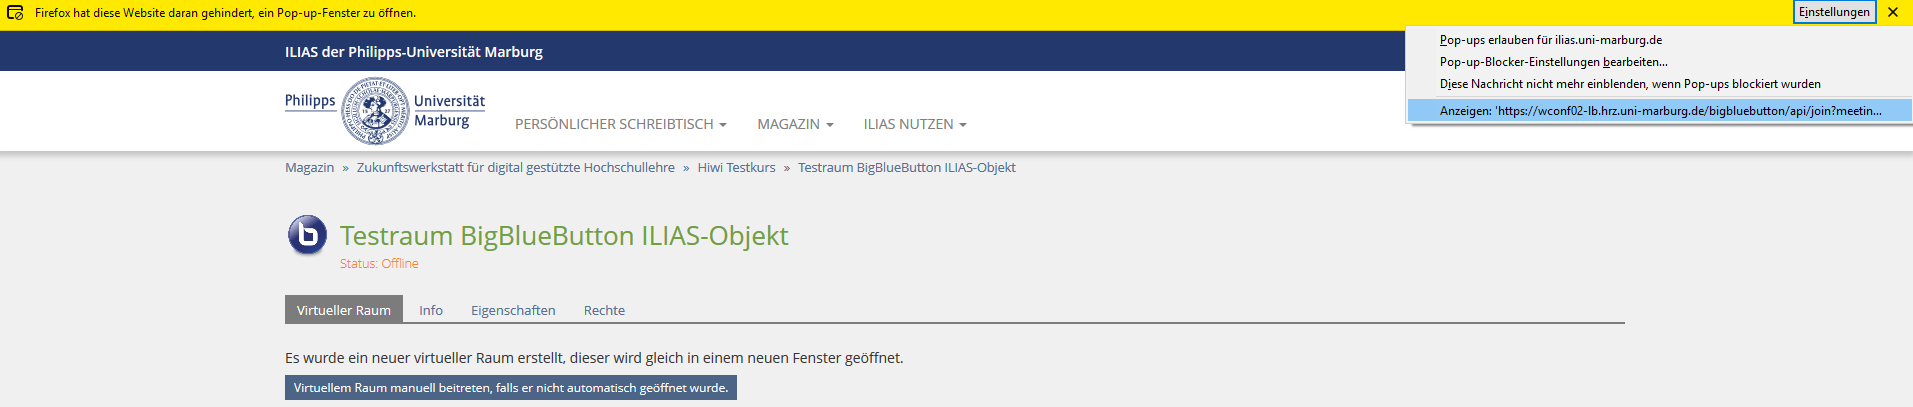
When opening a BigBlueButton room in ILIAS, your browser may warn you that a pop-up is about to open. You may need to allow this in order to access the BigBlueButton room. Please see the screenshot below.
A BigBlueButton room can be closed by administrators in ILIAS using its own button, as long as it has not been closed permanently using the "Close conference" function.
BigBlueButton rooms created using the ILIAS object do not appear on the personal dashboard.
The configuration options offered by a BigBlueButton room on the dashboard are not mapped to the ILIAS object to the same extent. Alternatively, a web link to a BigBlueButton room created via the dashboard can be stored within an ILIAS course. This room can be set up in such a way that it can still only be opened by the person who created it, but then offers the possibility of more specific settings. Furthermore, the ILIAS plugin for BigBlueButton does not offer the possibility to select one of the provided instances, which is offered on the selection page of the university's computer centre.
Setting up a consultation with BigBlueButton
This video shows you how to create a queue in a room in Big Blue Button with the default setting "Moderator approval required before entering the room" and how to allow waiting participants to join the room.
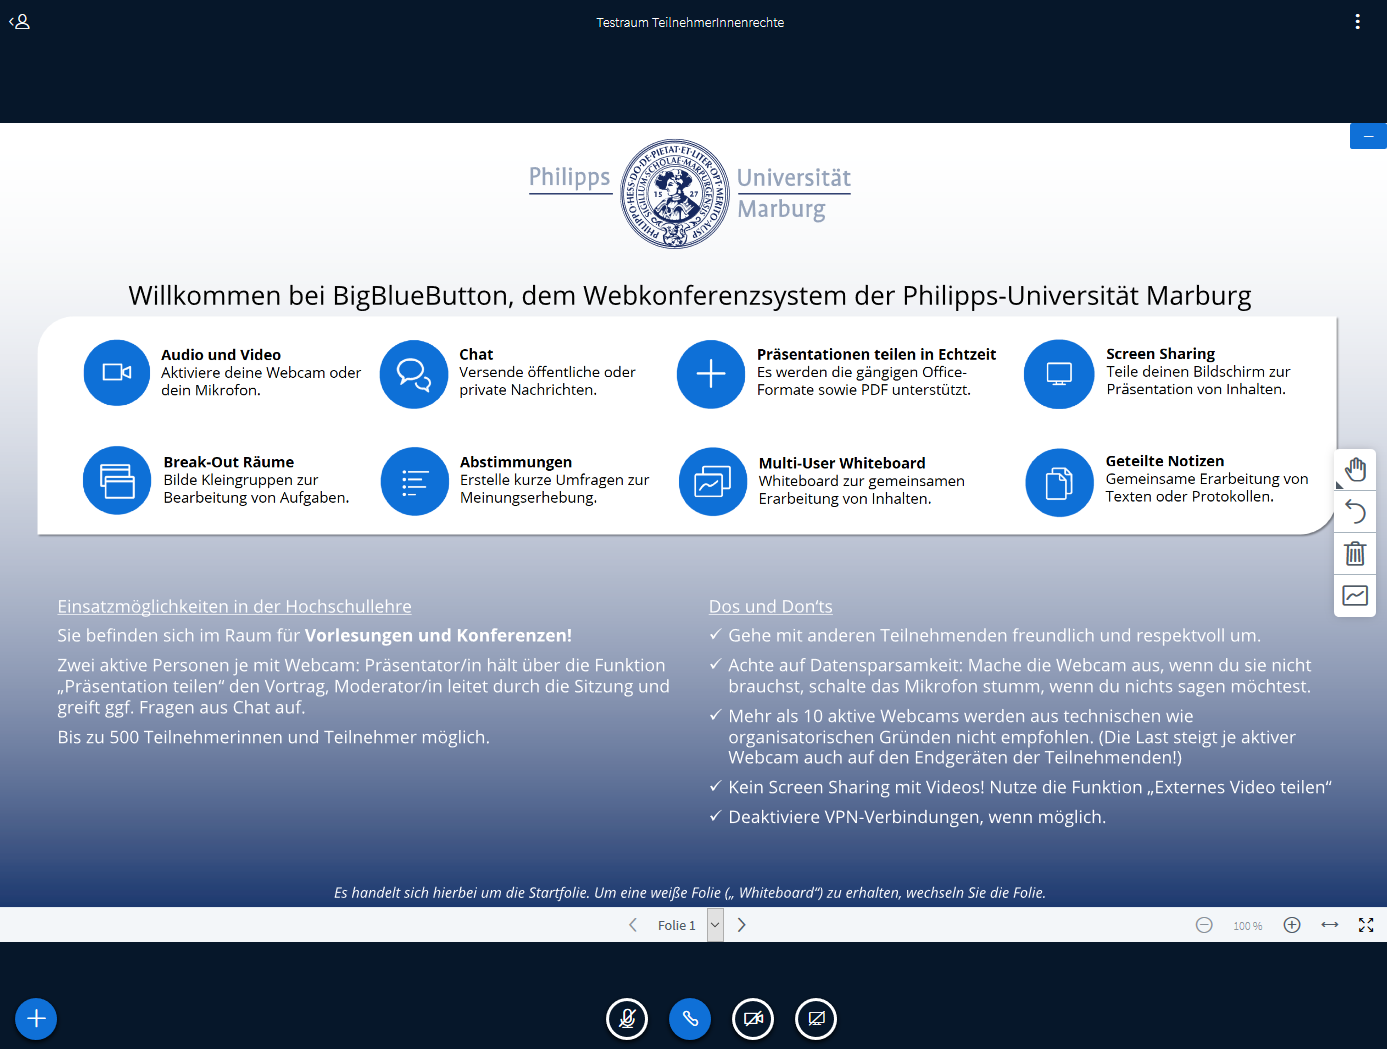
After opening the room, you will see the familiar interface.
When people try to enter the room, a pop-up message appears in the top right corner.
From the guest's perspective, when they try to join, the message "Please wait for a moderator to approve you to join the meeting" appears.
The number of "Waiting Participants" is displayed on the left side of the Participants Management area.
Clicking on the display will bring up a menu listing the number of unprocessed guests. Each guest can be individually approved or rejected.
In the upper part of the menu, all people can be accepted or rejected at once.
If you want to accept someone, you can do so in the expanded menu to the right of their name by clicking 'Accept'. In this way, you can allow multiple people to enter the room one at a time, or allow groups to enter at the same time.
[iln inst="1805" 2597017="2005474"]Further information, for example on the organisation of office hours in ILIAS, is available here.[/iln]
We would also like to refer you to our [iln inst="1805" 2447759="1883562"]How to run a successful webinar[/iln] page, where you can find valuable tips and tricks for running a web conference, presentation templates and welcome slides.
For common errors, see the troubleshooting suggestions below. See also the FAQ on web conferencing in HRZ's BigBlueButton.
A person cannot join a meeting
- Are you using the correct browser?
Please note: Only Chrome and Firefox are officially supported. Functionality in Safari or other browsers cannot be guaranteed. - Is the link to the meeting entry correct?
It can happen that an incorrect link is being shared by mistake, for example because you have created multiple rooms in BBB. - Other problems: often reloading the page, restarting the browser and clearing the cache and cookies will help. Make sure you have the latest version of the browser you are using!
- Disable VPN if it is currently in use and try to connect to the web conference again.
- Check your firewall settings.
A person can not be heard in a meeting
- Someone has their microphone on mute: You can see this by the microphone turning red in the user overview on the left. Simply click on the microphone icon in the middle of the conference.
- Someone has joined the meeting without a microphone. This is indicated by a headset icon next to the name instead of a microphone. You will need to log out of the meeting and select the microphone icon the next time you join the meeting.
- Someone is using Chrome or Firefox on an Apple device: If this is the case, check the browser settings under Preferences/Privacy to see if the browser has permission to share the microphone.
- Is the right microphone selected? The browser will often display a line indicating when access to the microphone is allowed, and you can also click there to specify which microphone should be used. For example, if someone has a headset connected to the laptop, the switch to the new microphone is not always automatic.
- Is the microphone in the system muted or very quiet? This error is more common in Windows 10. In this case, users can go to the Windows settings (Control Panel) and look for the microphone settings in the Sound menu. You can then select the correct microphone and adjust the input volume.
Sharing the screen does not work
- Someone is using Chrome or Firefox on an Apple device: In this case, check the browser settings (often the three dots in the top right corner) under Settings/Privacy to see if the browser has permission to share the screen.
- Check that the presenter has allowed people in the room to share the screen.
- Check that you have the presenter function to share your screen.
The transmission is jerky and there are longer audio dropouts
- In this case, the Internet connection is probably overloaded. All participants should try to turn off their cameras. Parallel downloads and uploads should be paused.
To prevent third parties from interfering with your web conference, please follow the instructions below:
- Avoid completely open rooms and if possible use verified groups (without anonymous participation). The use of the BigBlueButton plugin in ILIAS can be helpful here.
- Do not share the link to your BBB room publicly, only send it after you have registered (e.g. by email).
- Always password-protect BBB rooms.
- Use the feature that each joining of a BBB room must be confirmed in advance by the administrating person.
- Enable screen sharing for meeting hosts only and select the option for participants to join your room with the mic muted first.
- For larger events: Allow only the moderator to activate the microphone.
- You can remove people from ongoing videoconferences. It can be helpful to have several moderators during the event who can remove participants if necessary.
If you are experiencing disruptions during one of your BigBlueButton sessions, the following room moderation options are available to allow your session to continue undisturbed.
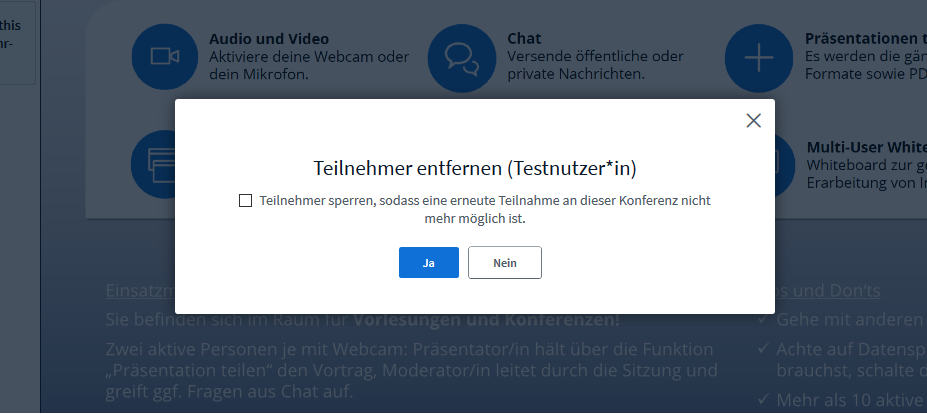
Remove participants from a session
You can remove participants from a BigBlueButton room. To do this, left-click on the icon of the person you want to remove in the participants overview. Then select 'Remove participant'.
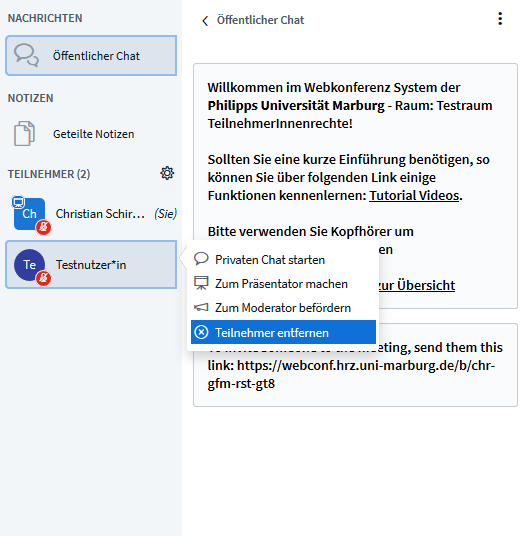
To prevent remote participants from entering the room again, select the box with the 'Lock participants' option and confirm their entry.
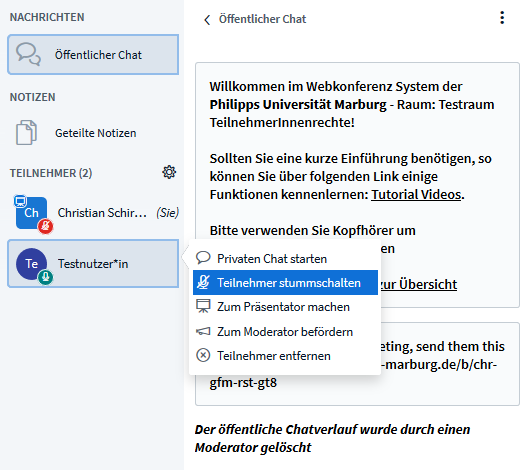
Mute participants in a session
Participants can be muted by you. To do this, left-click on the icon of the person you want to mute in the participant overview. Then select 'Mute participant'.
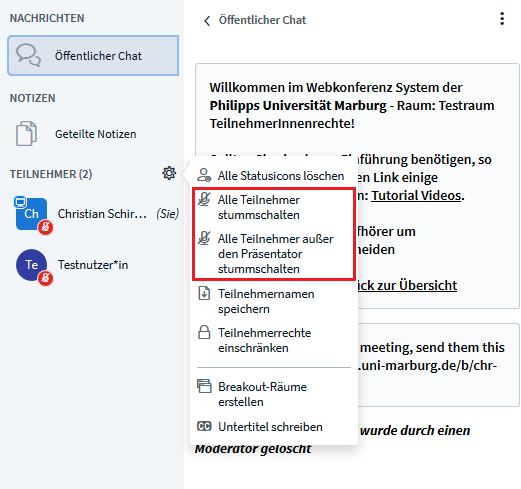
Selecting the gear icon in the participants list also gives you the option to mute all participants or all participants except the person with presenter status.
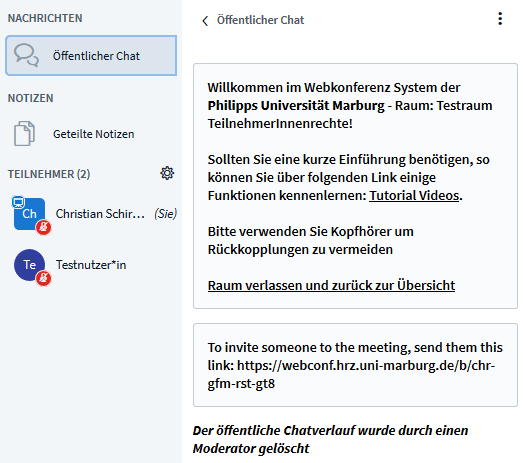
Delete chat posts from public chat
You can delete unwanted chat posts. Note that this is only possible if you delete the entire public chat.
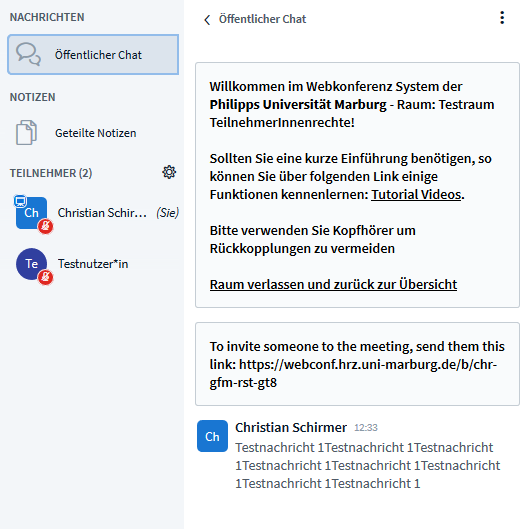
If you want to delete unwanted chat posts, select the Options menu next to the 'Public Chat' heading. Use the 'Delete' option.

The entire chat history will now be deleted.
Remove unwanted posts from the white board
If marks were made on the whiteboard that you want to clear, first disable the shared whiteboard.
Once you have done this, you can use the 'Clear all annotations' option to remove all markers from the whiteboard.

All annotations on the whiteboard have now been deleted by you.
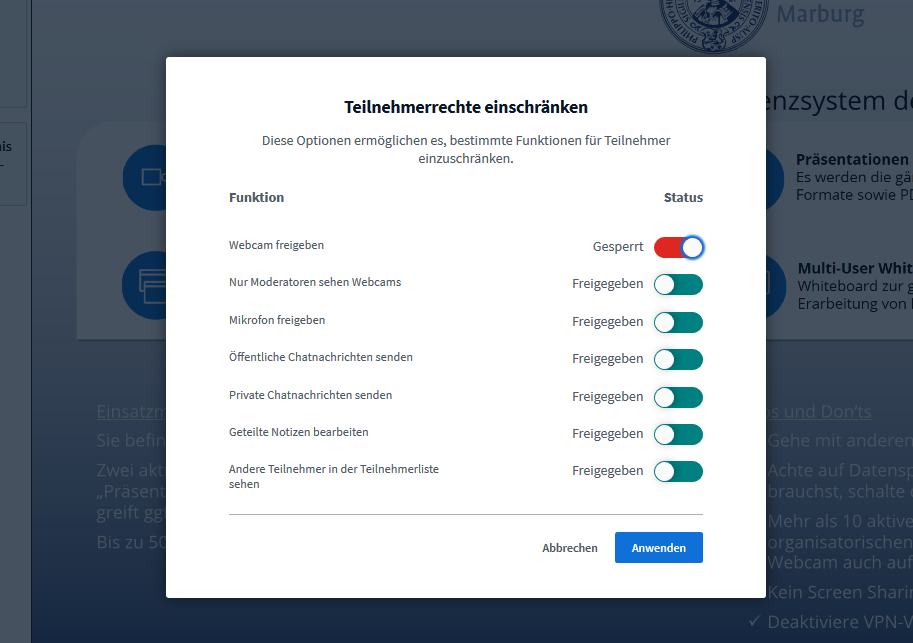
Restrict rights of the 'Participant' role
Select the gear icon on the right side in the participants overview and you will get the option to further restrict the rights of participants in the BBB session.
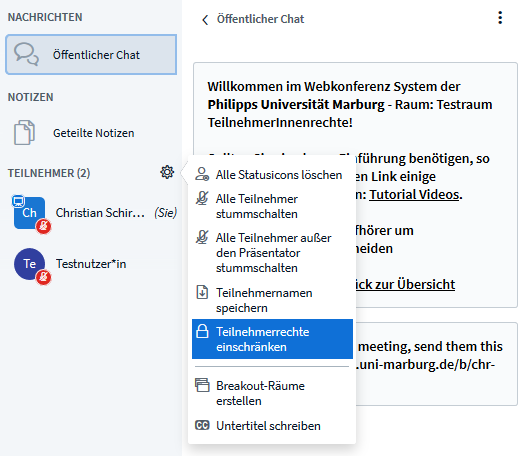
With the help of these functions you can, among other things:
- Restrict webcam sharing for participants
Set that only moderators can see webcams - Prohibit microphone sharing for participants
- Block the public chat for contributions from participants
- Prevent sending private messages to each other
- Block the editing of shared notes
- Make the list of participants visible only to the role of moderators
If you want to apply any of the options, click the slider icon on the right and click 'Apply'.
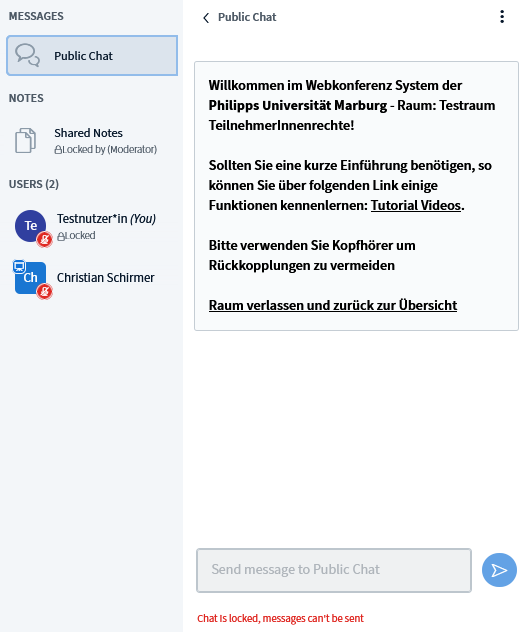
This is what a BigBlueButton room looks like from the participant's perspective when all participant rights are disabled.
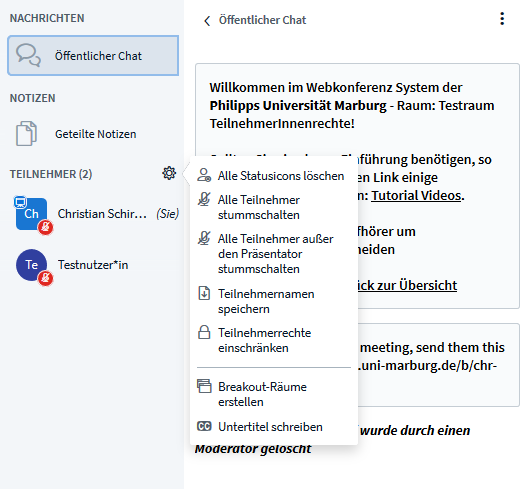
Further options in the participant overview
If you select the gear icon in the participants overview, you also have the following options:
- Delete all status icons
- Mute all participants
- Mute all participants except the presenter
Save attendee names
Adjust room settings in advance
You should also set your room preferences so that participants are muted and do not join your BigBlueButton room as moderators. Depending on your event, you should also consider the other options available to you when setting up a room.
Return to the home page